I constantly find myself wanting to document knowledge across different topics, from coding to gardening, but couldn’t find a suitable solution. After googling a bit myself I asked Claude to do some research around the topic and it came up with a solution that offers complete control while still being not overly complex. In case you are interested, here are the research results as a Markdown file.
In addition to documenting the process for myself, I also hope that someone else might find this post useful. Right now this is planned as a two-part series, with Part 1 focusing on the core setup. By the end of this post, we will have a blog running at your-name.netlify.app with automatic deployments, complete data ownership and zero ongoing costs. Part 2 will cover additional tools, analytics setup and also added functionality in the form of comments.
Throughout this guide, we’ll use git command line to manage our repository, which gives us more control and understanding of the process than GUI tools.
Table of Contents
- What We’ll Build
- Why This Tech Stack?
- Prerequisites
- Step 1: Repository and Authentication Setup
- Step 2: Hugo Installation and Basic Setup
- Step 3: Content Creation Basics
- Step 4: Netlify Deployment
- Step 5: Essential Configuration and Git Setup
- Step 6: Publishing Your First Post
- What We’ve Accomplished
- Your Blog Workflow
- Next Steps
What We’ll Build
After following this guide, we’ll have:
- ✅ A Live blog at a custom .netlify.app domain
- ✅ Automatic deployments - write, commit, push, and the post goes live
- ✅ Fast static site with mobile optimization
- ✅ Complete data ownership - all content stored in a GitHub repository
- ✅ Professional appearance with a clean, modern theme
- ✅ Future-proof foundation ready for custom domains and monetization
Here’s what our blog will look like after completing the setup (PaperMod, the theme we will use, offers light and dark mode by default):
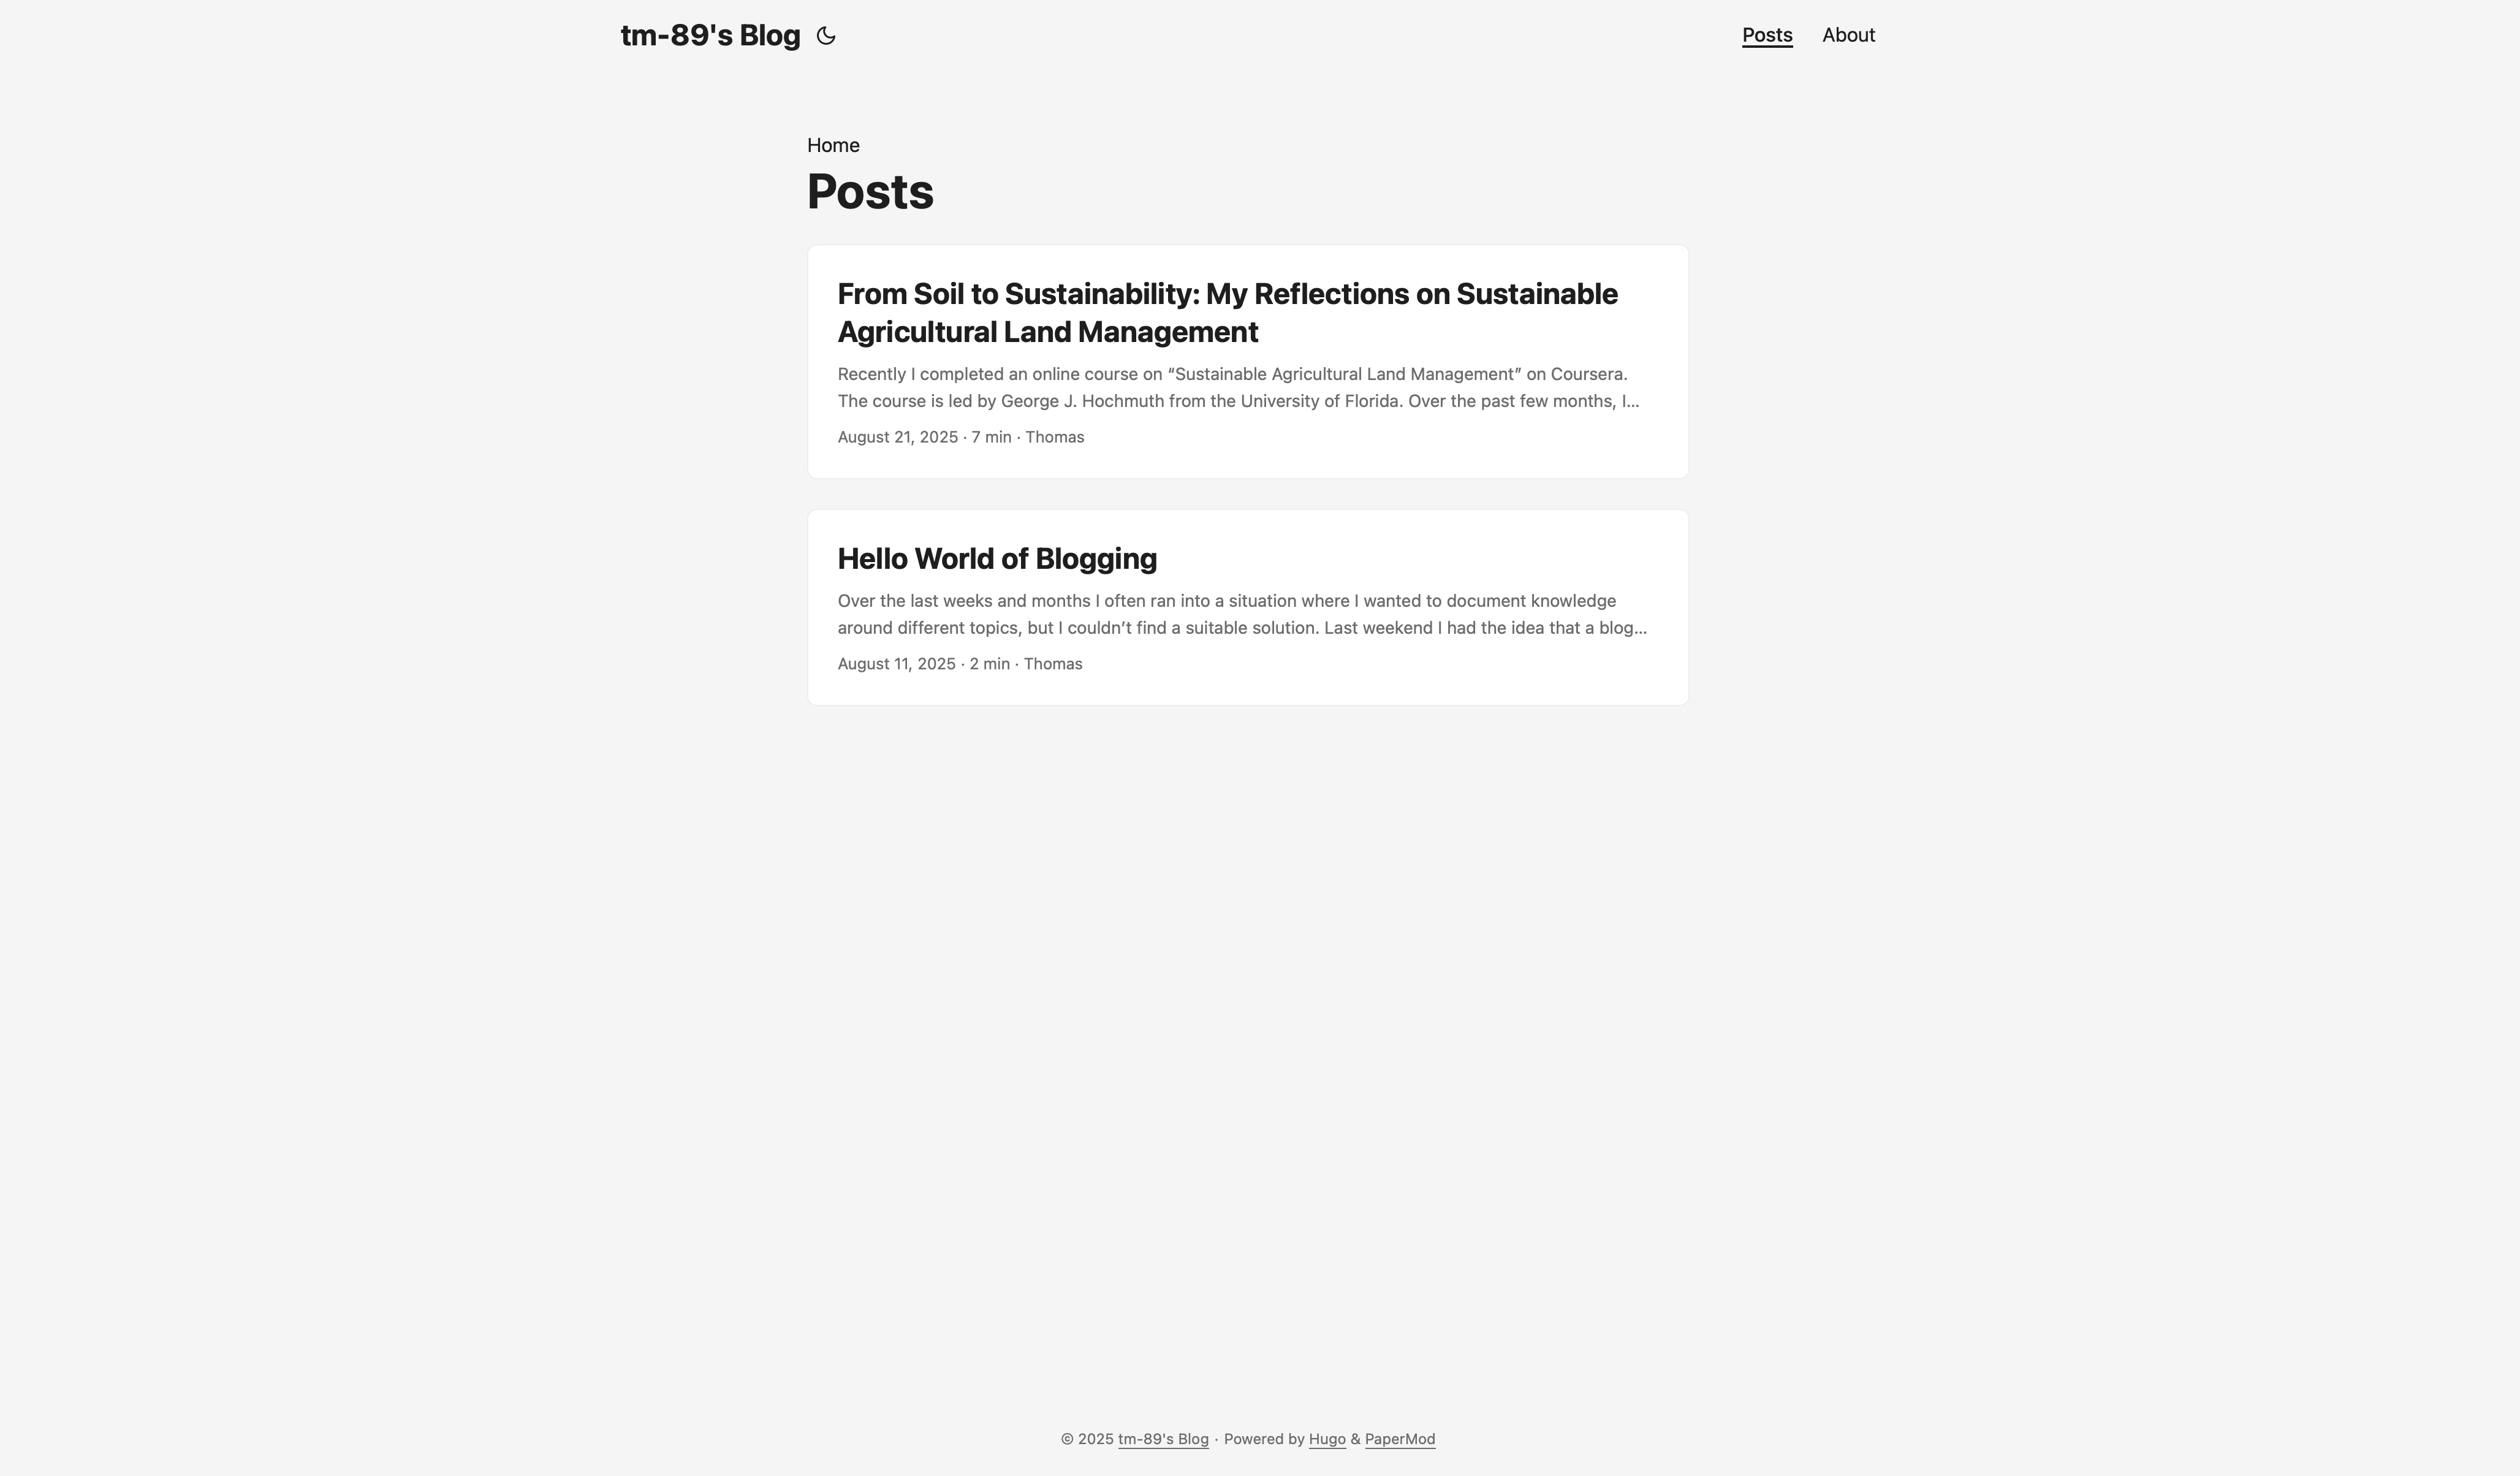 Homepage view in light mode.
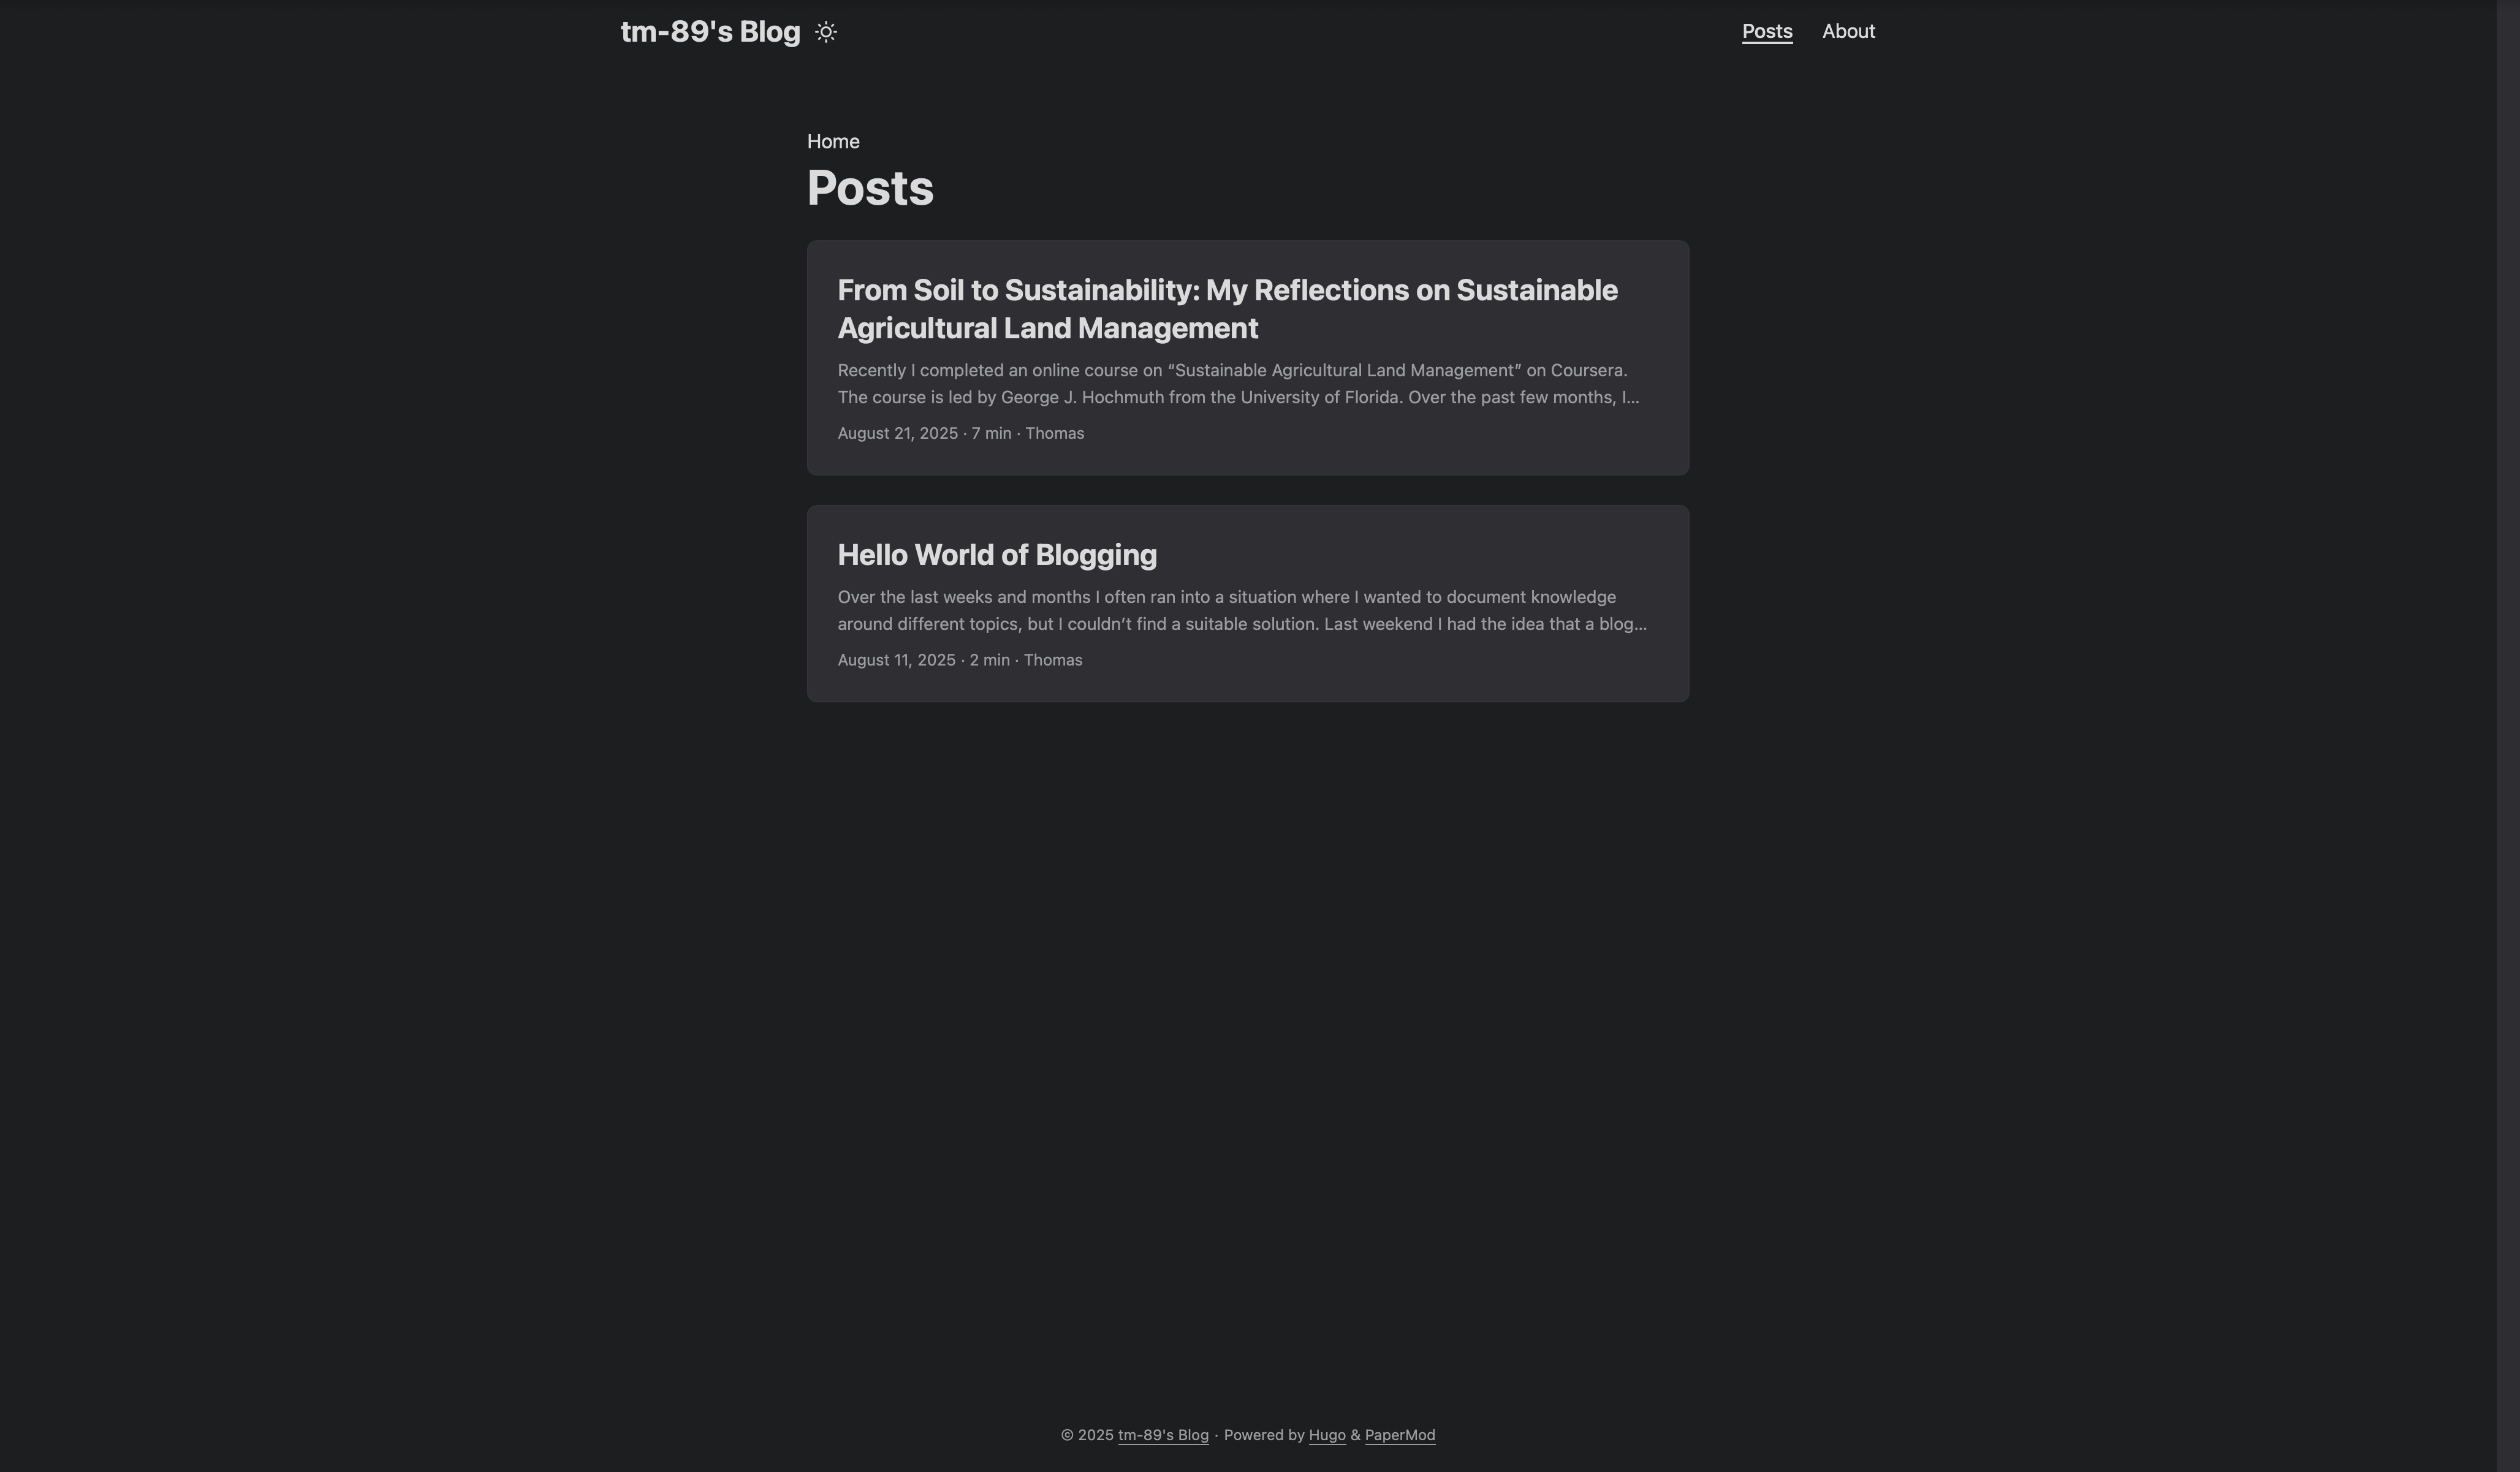 Homepage view in dark mode.
Why This Tech Stack?
Before diving into the setup, let me briefly explain why I chose Hugo + Netlify + GitHub. While there are many blogging platforms available, each comes with trade-offs between convenience, control, and cost. Traditional platforms like Medium and WordPress.com offer easy setup but limit customization and data ownership. Self-hosted solutions like WordPress.org provide full control but require server maintenance and ongoing costs. Additionally, having the blog posts as simple Markdown files comes with a lot of flexibility and makes it easier to switch to another tech stack in the future. Having your blog posts on a website like WordPress does not come with that flexibility and control.
Our static site approach has multiple advantages:
- ✅ Free hosting with professional performance
- ✅ No maintenance - no servers, databases, or security updates
- ✅ Your content, your rules - export anytime as standard Markdown files
- ✅ Scales well - handles traffic spikes automatically
- ✅ Future flexibility - upgrade paths available when needed
Prerequisites
There are some basic prerequisites to set up our own blog:
- Basic comfort with command line
- A GitHub account (free)
- About 2 hours of focused time
- A Mac, Windows, or Linux computer
Don’t worry if you’re not deeply technical, I’ll provide exact commands and explain what each step does and you only have to copy&paste them.
Step 1: Repository and Authentication Setup (20 minutes)
We’ll start by creating the foundation: a GitHub repository to store our blog content and handle version control.
Create Your Blog Repository
- Go to GitHub.com and sign in to your account
- Click the green “New” button to create a new repository
- Repository name: Choose something like
your-name-blogorpersonal-blog - Keep it public or private (both work with Netlify’s free tier)
- Add a README file
- Choose MIT License (allows others to learn from your setup)
- Click “Create repository”
When choosing a license, GitHub’s picker offers limited options, and we don’t need to spend too much time on this decision now since it can be changed later. However, I specifically avoided Creative Commons Zero (CC0) which would put your work in the public domain and eliminate future monetization control (which I would like to keep as an option). The MIT License is particularly suitable for blog repositories because it’s permissive and widely understood. It allows others to learn from your setup and configuration while still giving you full ownership of your content. If someone wants to use your blog structure as a starting point for their own project, they can do so freely while attributing your original work.
Set Up Authentication
Since GitHub disabled password authentication in 2021, we’ll use a Personal Access Token instead.
Create a Personal Access Token:
- GitHub Settings: Click your profile picture → Settings
- Developer settings: Scroll down → Developer settings → Personal access tokens → Tokens (classic)
- Generate new token: Click “Generate new token (classic)”
- Configure the token:
- Note: “Blog Repository Access” (or something similar)
- Expiration: 1 year (maximum amount of time possible)
- Scopes: Check “repo” (full repository access)
- Generate token and copy it immediately (you won’t see it again!)
We’re creating a general token with “repo” scope that works across all your repositories, which is simpler for personal use than repository-specific tokens. Store the token securely in your password manager or rely on your operating system’s credential storage. Don’t worry if you lose the token, you can always create a new one and delete the old one.
Store the token securely:
- macOS: We’ll configure Keychain integration below
- Windows/Linux: Store in your password manager
Clone Repository Locally
Now that we have created a GitHub repository for our blog contents and an access token, it’s time to clone the repository locally. We’ll do this using the following commands in the command line.
# Navigate to where you want your blog folder
# or wherever you keep projects
cd ~/dev

# Clone your repository (replace with your username and repo name)
git clone https://github.com/your-username/your-blog-name.git

# Enter the directory
cd your-blog-name

# Configure Git to use Keychain (macOS) for automatic token storage
git config --global credential.helper osxkeychain
When we first push changes, Git will prompt us for authentication. We’ll need to explicitly select the username and password authentication method when prompted. We use our GitHub username and paste the Personal Access Token as the password – using our actual GitHub password will result in an error. The system will then remember these credentials for future operations.
Step 2: Hugo Installation and Basic Setup (30 minutes)
Hugo is a static site generator written in Go that transforms your Markdown files into a fast, beautiful website. It’s known for its incredible build speed, extensive theming system, and powerful content management features. Unlike dynamic content management systems, Hugo generates static HTML files that can be served from any web server, making our site extremely fast and secure.
Install Hugo
Here are the installation instructions for Hugo for macOS, Windows and Linux. Currently I am only working on macOS, so I haven’t tried the instructions for Windows and Linux myself!
macOS (using Homebrew):
# Install Homebrew if you don't have it
/bin/bash -c "$(curl -fsSL https://raw.githubusercontent.com/Homebrew/install/HEAD/install.sh)"

# Install Hugo
brew install hugo

# Verify installation
hugo version
Windows (using Chocolatey):
# Install Chocolatey if you don't have it (run as Administrator in PowerShell)
Set-ExecutionPolicy Bypass -Scope Process -Force; [System.Net.ServicePointManager]::SecurityProtocol = [System.Net.ServicePointManager]::SecurityProtocol -bor 3072; iex ((New-Object System.Net.WebClient).DownloadString('https://community.chocolatey.org/install.ps1'))

# Install Hugo
choco install hugo-extended

# Verify installation
hugo version
Linux (Ubuntu/Debian):
# Download and install Hugo
sudo apt update
sudo apt install hugo

# Verify installation
hugo version
Create Your Hugo Site
Now that we have Hugo installed, let’s create a new site in the repository we created earlier.
# Create Hugo site in your existing repository
hugo new site . --force
# The --force flag allows Hugo to create files in a non-empty directory
Hugo will create the following directory structure:
your-blog/
├── archetypes/    # Content templates
├── assets/        # Source files for processing
├── content/       # Your blog posts go here
├── data/          # Configuration data
├── layouts/       # Custom templates (we'll use a theme instead)
├── static/        # Images, CSS, JS files
├── themes/        # Theme storage
└── hugo.toml      # Main configuration file
Choose and Install a Theme
We’ll use PaperMod – a fast, clean theme that’s particularly well-suited for technical content and personal blogs. During my research, Claude suggested both PaperMod and Ananke (Hugo’s default theme) as good options. I chose PaperMod because it seemed to require less initial configuration and looked cleaner at first sight, while offering great performance, mobile responsiveness, and features like dark mode and code syntax highlighting. You can explore more themes at Hugo Themes if you prefer something different.
# Add PaperMod theme as a Git submodule
git submodule add --depth=1 https://github.com/adityatelange/hugo-PaperMod.git themes/PaperMod

# Update the theme
git submodule update --init --recursive
When you clone the repository with your blog on a new machine, the submodule will not be cloned automatically. So you either have to clone it explicitly together with the repository (option 1), or you have to initialize the submodules after cloning (option 2).
# Option 1: Clone with submodules in one command
git clone --recurse-submodules https://github.com/your-username/your-blog-name.git

# Option 2: If already cloned, initialize submodules
git submodule update --init --recursive
Configure Your Site
Edit the hugo.toml file (this is our main configuration):
# We'll update this later
baseURL = "https://your-site-name.netlify.app"
languageCode = "en-us"
title = "Your Blog Name"
theme = "PaperMod"
# We'll add this in Part 2
googleAnalytics = "G-XXXXXXXXXX"

[params]
  # Critical: Tells Hugo which content to show on homepage
  mainSections = ["posts"]
  ShowReadingTime = true
  ShowPostNavLinks = true
  ShowBreadCrumbs = true
  ShowCodeCopyButtons = true

  # Optional: Add your information
  author = "Your Name"
  description = "Your blog description for search engines"

# Menu configuration - required for About page navigation
[menu]
  [[menu.main]]
    name = "Posts"
    url = "/posts/"
    weight = 10
  [[menu.main]]
    name = "About"
    url = "/about/"
    weight = 20
Important Notes:
- The
mainSections = ["posts"]line is essential. Without it, Hugo will use the first folder alphabetically within the content directory for our homepage, which can cause posts to not appear where expected. For example, if we have a subfolder “drafts” in “content”, Hugo would by default use that folder as it comes before “posts” alphabetically. - The
[menu]section creates navigation links in your blog’s header. Theweightparameter controls the order – lower numbers appear first, so “Posts” (10) will appear before “About” (20). Without this menu configuration, readers won’t be able to navigate to your “About” page even though it exists.
Step 3: Content Creation Basics (20 minutes)
Let’s create our first blog post to understand Hugo’s content system and to get our blog started.
Create Content Structure
# Create the posts directory
mkdir -p content/posts

# Create your first post
hugo new content/posts/welcome-to-my-blog.md
Hugo creates a file with front matter (metadata) that looks like this:
+++
title = 'Welcome to My Blog'
date = 2025-08-11T20:00:00+02:00
draft = true
+++
Understanding Front Matter
The section between +++ markers contains metadata about your post:
- title: What appears in the browser tab and as the post heading
- date: When the post was written (affects sorting and display)
- draft: If
true, post won’t appear on the live site (useful for work in progress)
Important Note: The date field is crucial for publishing. If you set a date in the future, Netlify will build your site before that time has passed, and Hugo will exclude the future-dated post from the build. Even after the time passes, Netlify won’t automatically rebuild, so your post will remain invisible until you manually trigger a new deployment.
Edit The First Post
Open content/posts/welcome-to-my-blog.md and replace the content:
+++
title = "Welcome to My Blog"
date = "2025-08-24T20:00:00+02:00"
draft = false
tags = ["welcome", "introduction"]
categories = ["General"]
description = "An introduction to my new blog"
+++

# Hello World!

Welcome to my new blog! This is where I'll be documenting my thoughts and experiences on various topics.

## What You'll Find Here

I plan to write about:
- **Technology**: Coding projects, tools, and tutorials
- **Personal interests**: Books, hobbies, and random discoveries
- **Learning experiences**: Documenting what I discover along the way

## Why I Started This Blog

I wanted a place to organize my thoughts and share what I learn. Rather than keeping notes scattered across different apps, I decided to create something public that might help others too.

Thanks for stopping by!
Important Note: Change draft = true to draft = false when we’re ready to publish.
Test Locally
Before deploying our blog online, we first have a look at it locally with the Hugo development server.
# Start the Hugo development server
hugo server -D
# The -D flag includes draft posts in the preview
If we open our browser to http://localhost:1313, we should see our blog with the new post!
The development server automatically reloads when we save changes, making it easy to write and preview simultaneously.
Step 4: Netlify Deployment (25 minutes)
Now we’ll deploy our blog to the web using Netlify, which provides free hosting with automatic deployments. Every time we push changes to our GitHub repository, Netlify will automatically deploy a new version of the blog based on the latest commit.
Create Netlify Configuration
Create a netlify.toml file in your repository root:
[build]
  publish = "public"
  command = "hugo --gc --minify"

[context.production.environment]
  HUGO_VERSION = "0.146.0"
  HUGO_ENV = "production"

[context.deploy-preview.environment]
  HUGO_VERSION = "0.146.0"
This file tells Netlify:
- Use Hugo version 0.146.0 (important for theme compatibility)
- Build command:
hugo --gc --minify(creates optimized static files) - Publish directory:
public(where Hugo puts the generated site)
The Hugo version specification is critical – without it, Netlify uses an older default version (v0.131.0) which causes PaperMod theme builds to fail with compatibility errors.
Connect GitHub to Netlify
- Go to netlify.com and sign up (free account)
- Click “Add new site” → “Import an existing project”
- Choose GitHub and authorize Netlify to access your repositories
- Select your blog repository
- Configure build settings:
- Branch to deploy: main
- Build command: (leave empty - netlify.toml handles this)
- Publish directory: (leave empty - netlify.toml handles this)
- Click “Deploy site”
Netlify will assign a random URL like amazing-cupcake-123456.netlify.app. But it’s very easy to set a URL ourselves.
Customize Your Site Name
- In Netlify dashboard: Click on your site
- Site settings → General → Site details
- Click “Change site name”
- Enter something memorable: like
your-name-blogoryour-topic-notes - Your new URL:
your-chosen-name.netlify.app
Update Hugo Configuration
Update hugo.toml with the actual Netlify URL:
baseURL = "https://your-chosen-name.netlify.app"
# ... rest of your configuration
Step 5: Essential Configuration and Git Setup (15 minutes)
Let’s add the finishing touches to make our blog production-ready.
Create .gitignore
Create a .gitignore file to exclude generated files from version control:
# Hugo
/public/
/resources/_gen/
.hugo_build.lock

# OS files
.DS_Store
Thumbs.db

# Editor files
.vscode/
.idea/
*.swp
*.swo
Add Essential Files
Create an “About” page (optional but recommended for reader trust). Note that we already configured the menu in Step 2 to make this page accessible – without that menu configuration, the “About” page would exist but readers couldn’t navigate to it.
# Create About page
hugo new content/about.md
Edit content/about.md:
+++
title = "About"
date = "2025-08-11T20:00:00+02:00"
draft = false
+++

Write a brief introduction about yourself and what your blog covers.
Step 6: Publishing Your First Post (10 minutes)
Time to let our blog go live! Before we push the changes to GitHub, we’ll briefly check them locally. This helps us identify configuration issues that could cause deployment problems.
Prepare for Publishing
- Ensure the post is ready: Change
draft = falsein the post’s front matter - Test locally one more time: Run
hugo server(without-D) to see only published content - Verify everything looks good at
http://localhost:1313
This local testing step is crucial. For example, during my setup process, I discovered that my blog’s homepage was displaying content from a content/drafts/ folder instead of content/posts/ because I hadn’t configured the mainSections parameter. The homepage showed draft content while my published welcome post was invisible on the main page but visible at /posts/. Local testing immediately revealed this configuration issue, which would have been confusing for visitors to the live site.
How to recognize configuration issues: When something works locally but behaves unexpectedly after deployment, it’s often a configuration problem. Key warning signs include: content not appearing where expected, navigation not working, or features that worked locally failing on the live site. Always test locally with hugo server (without the -D flag) before deploying to catch these issues early.
Deploy to Production
# Stage all changes
git add .

# Commit with a descriptive message
git commit -m "Initial blog setup with first post

- Add Hugo configuration and PaperMod theme
- Create welcome post and About page
- Configure Netlify deployment"

# Push to GitHub (triggers automatic Netlify deployment)
git push origin main
Watch The Site Go Live
- Check Netlify dashboard: We’ll see the build in progress
- Build logs: Click on the deployment to see detailed logs
- Wait 1-2 minutes: For the build to complete
- Visit our live site:
https://your-chosen-name.netlify.app
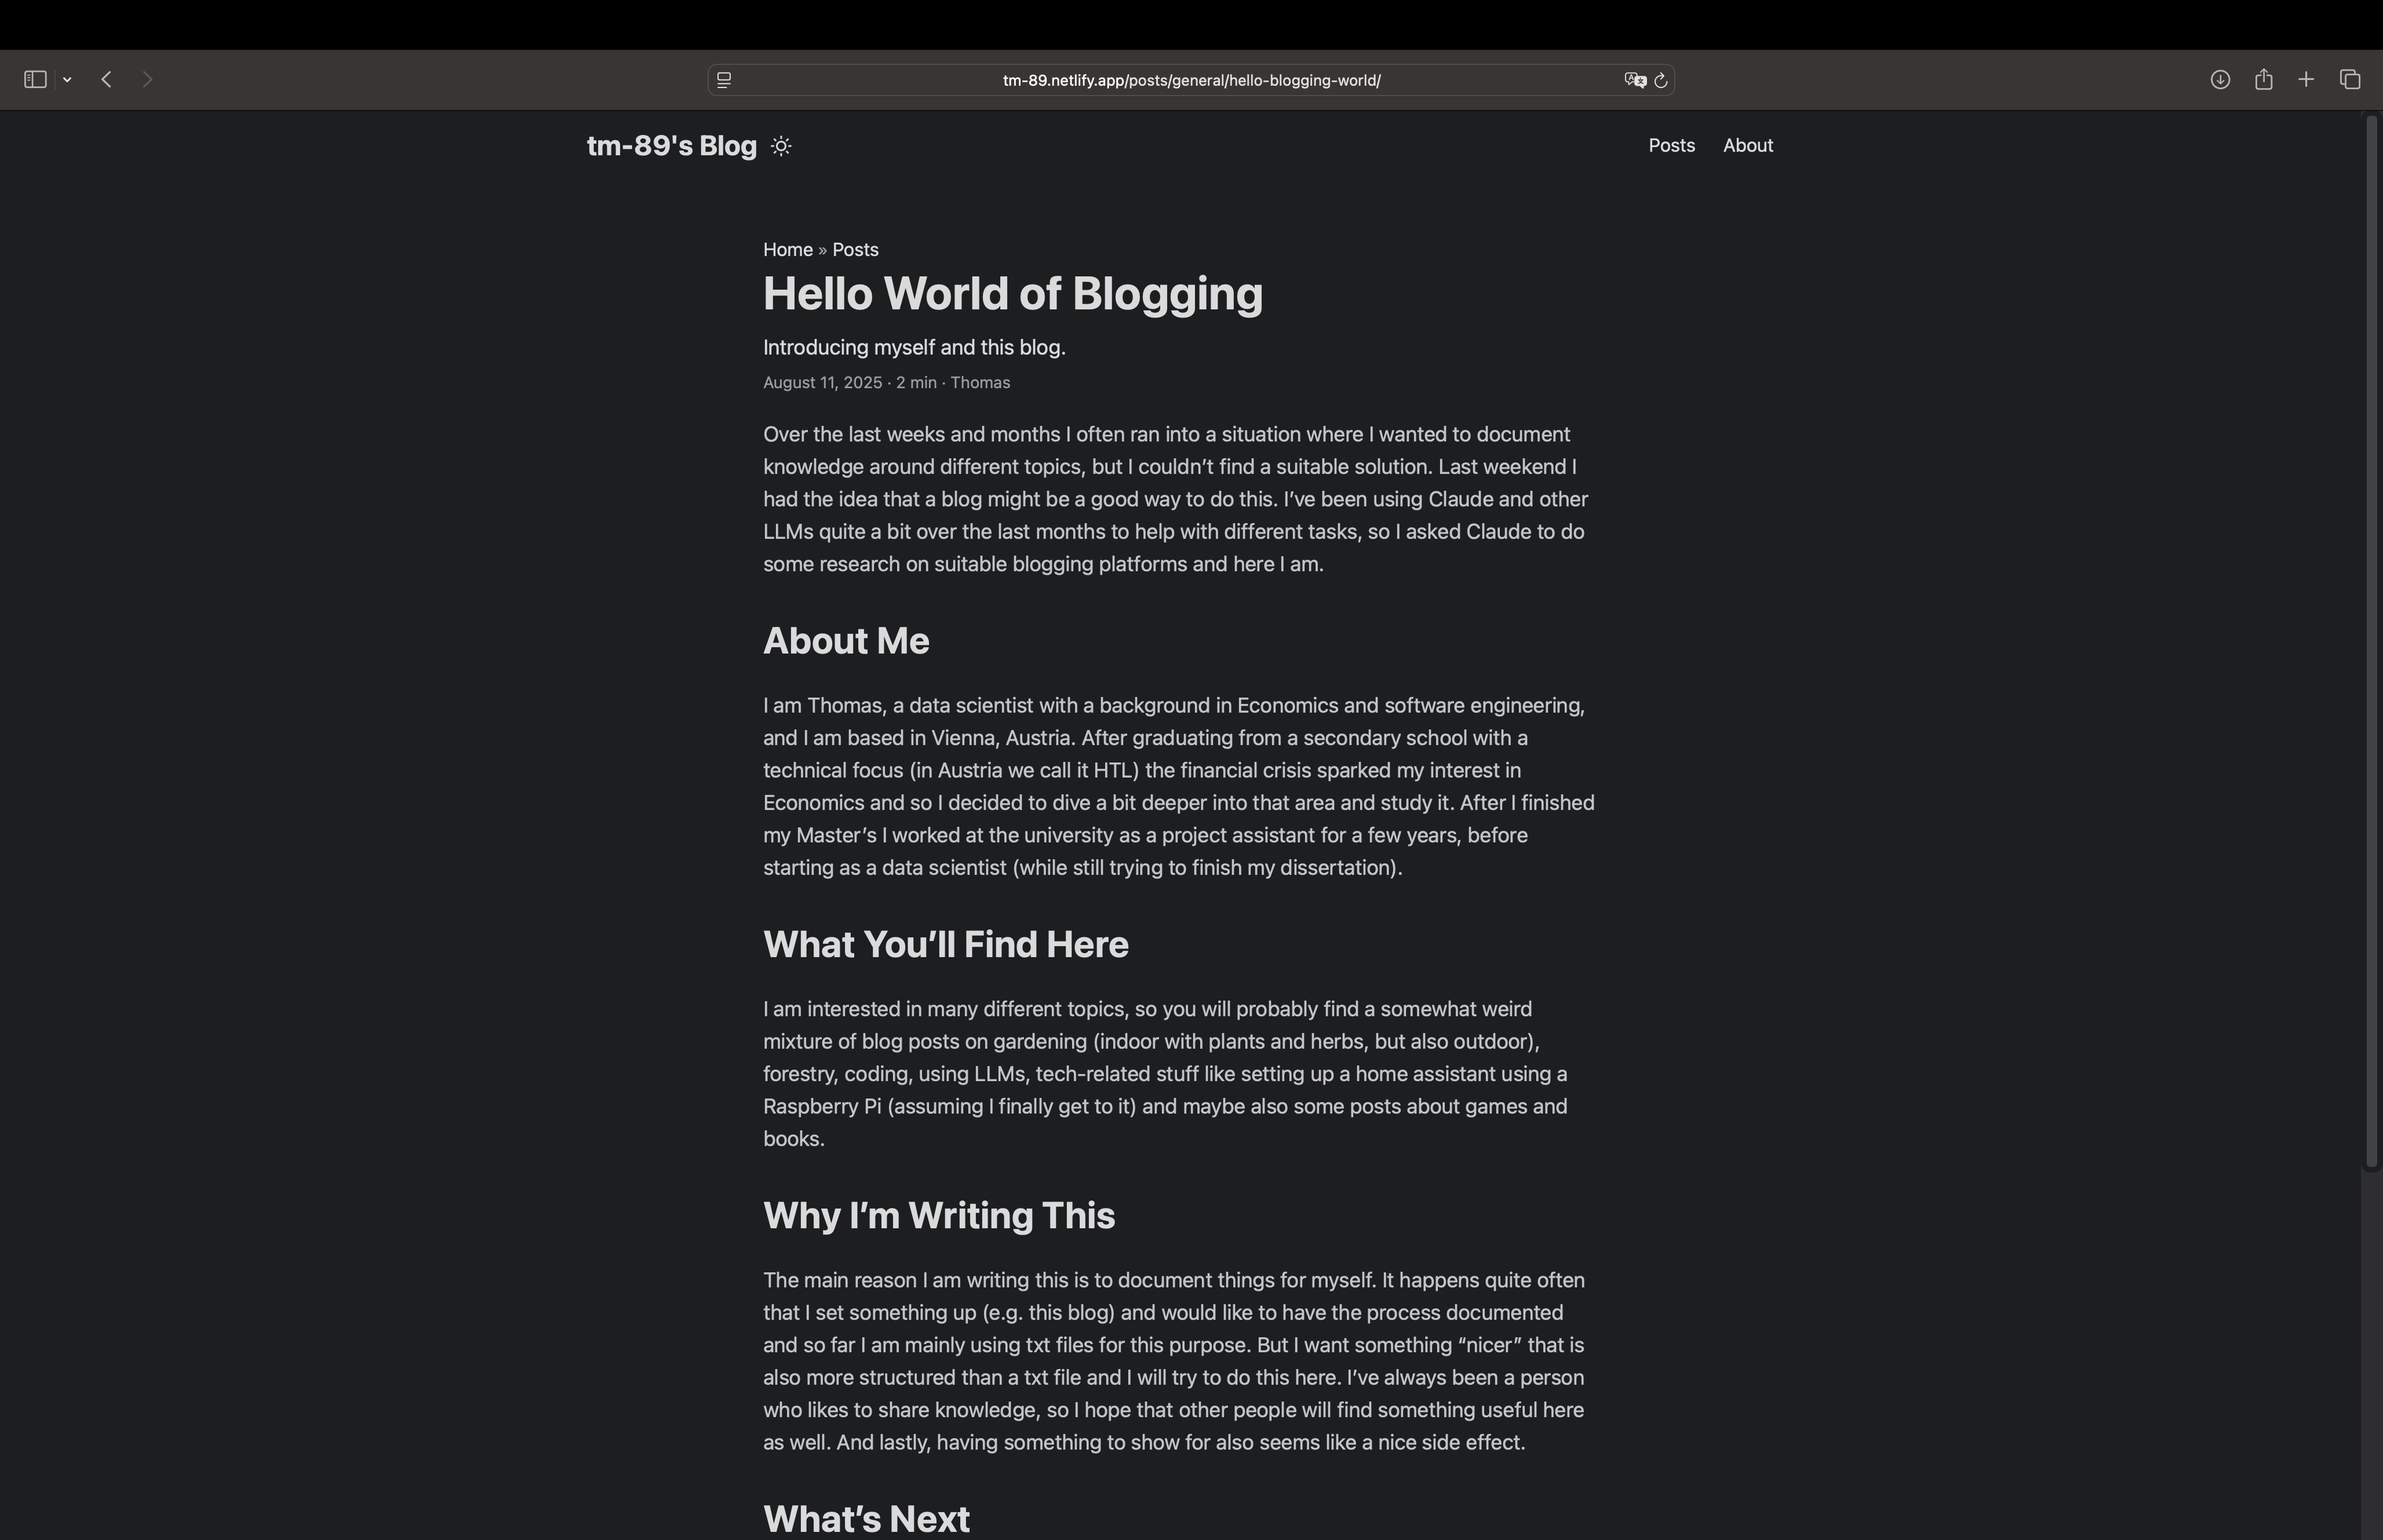 Here’s our first published blog post live on the internet!
With this last step we can now see our blog and our first blog post live under https://your-chosen-name.netlify.app.
What We’ve Accomplished
We now have a professional blog with:
- Modern infrastructure: Static site generation with global CDN
- Automatic deployments: Write → Commit → Push → Live
- Complete ownership: All content in our GitHub repository
- Zero ongoing costs: Free hosting with room to grow
- Professional appearance: Clean, fast, mobile-optimized theme
- SEO ready: Proper metadata and site structure
The Blog Workflow
Going forward, creating new posts is simple:
- Create new post:
hugo new content/posts/my-new-post.md - Write your content in Markdown
- Test locally:
hugo server - Publish: Change
draft = false - Deploy:
git add . && git commit -m "Add new post" && git push
Next Steps
Our blog foundation is solid, but there’s so much more we can do! In Part 2 of this series, I’ll show you how to:
- Enhance your writing workflow with Obsidian for visual content organization
- Set up Google Analytics to understand your audience
- Add a comments system with Giscus (GitHub-based, privacy-friendly)
- Optimize VS Code for efficient blog writing
- Create content templates for consistent posting
- Implement advanced SEO and performance optimizations
The best part? Everything we’ve built is designed to grow with us. When we’re ready for a custom domain, advanced features, or even monetization, this foundation supports it all.
Ready to take our blog to the next level? Check out Part 2: “Building a Blog - Part 2: Helpful Tools and Additional Functionality” (coming soon).